Laser Engraver for Golf Clubs: A Practical Buying Guide
A pulsed fiber laser is usually the first machine to evaluate for engraving metal golf club heads. Choose it around the club’s alloy, finish, required mark and physical fit. For a pro shop, repeatable positioning and a safe enclosure matter as much as wattage, especially when the shaft remains attached.
A set of initials on a wedge and a recessed, paint-filled design on a putter are different jobs. Before requesting a quote, decide whether you want surface contrast, coating removal or measurable depth. Then ask for a sample on the same club model and finish you intend to sell.
Match the laser to the club material and finish
Identify both the underlying material and the surface treatment. A black head may be painted, plated or treated by another process; its appearance alone cannot tell you how it will respond. Good-Laser’s overview of metal laser engraving provides a starting point for separating metal applications from general craft engraving.
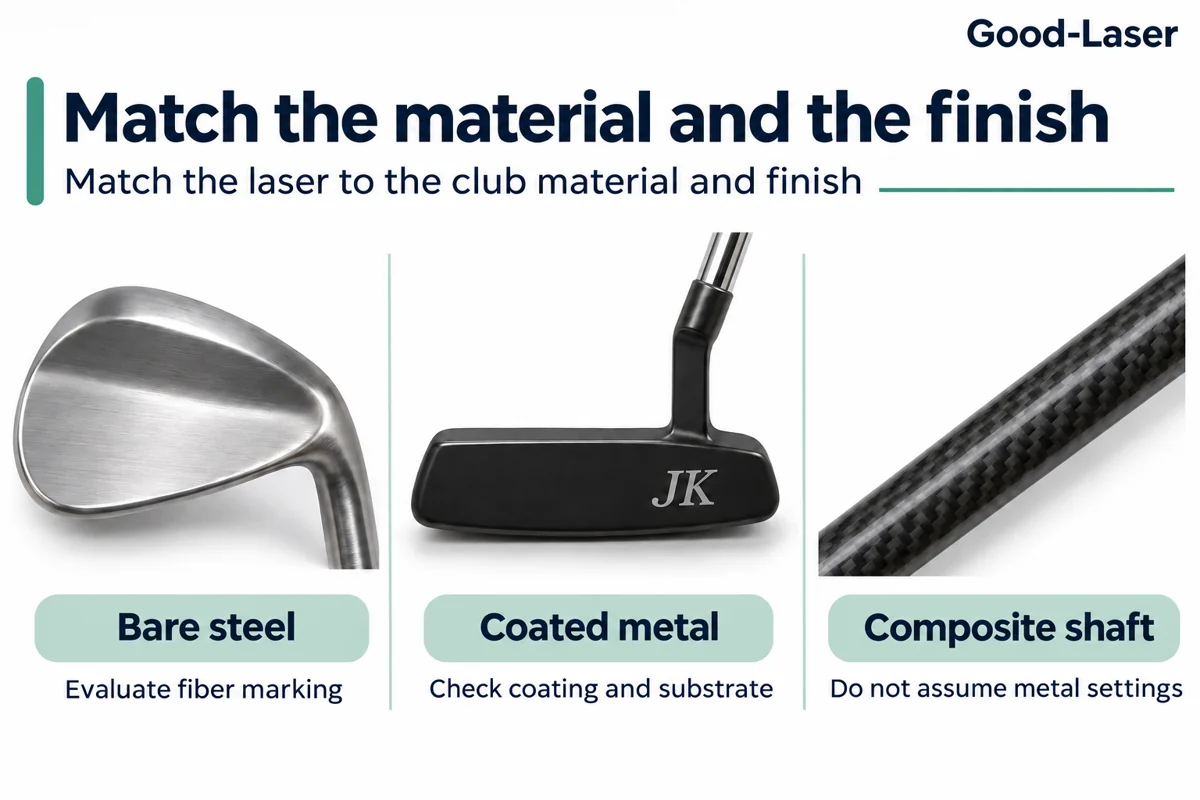
| Component or surface | Machine or process to evaluate | What to establish before accepting the job |
|---|---|---|
| Stainless steel wedge, iron or putter head | Pulsed fiber marking or engraving | Alloy, required contrast, depth and finish after cleaning |
| Carbon steel head | Pulsed fiber, with a finish-specific trial | Whether removing the finish exposes steel that needs corrosion protection |
| Titanium or mixed-material driver head | Specialist assessment of the exact marking location | Wall construction, coatings, inserts and the club manufacturer’s guidance |
| Painted, plated or otherwise coated metal | Controlled coating removal or a compatible marking process | Edge quality, remaining coating, exposed substrate and durability |
| Steel shaft or curved hosel | Fiber system with suitable support and positioning | Wall thickness, curvature, accessible area and structural restrictions |
| Graphite/composite shaft, grip or ferrule | Separate material qualification | Do not transfer metal settings to resins, rubber or unidentified plastics |
Fiber, MOPA, diode or CO₂?
For direct engraving of bare metal heads, compare pulsed fiber systems first. MOPA fiber configurations can offer adjustable pulse duration as well as frequency, giving an operator more ways to tune the surface result. MOPA is a source configuration, not a promise of color, depth or damage-free processing. Confirm the actual source and controls in the quotation.
Desktop CO₂ machines are generally better matched to non-metal golf merchandise such as wooden presentation boxes and suitable acrylic awards. Some coatings and metal-marking compounds permit surface marks, but that is different from removing the underlying metal. Blue-diode machines also need material-specific evaluation. A dual-source machine’s infrared module must not be confused with its blue-diode rating.
Golf balls are another application altogether. Their covers and coatings need their own assessment; successful metal-head engraving does not establish compatibility with a ball or grip.
Choose the finish before choosing the power
Specify what the finished customer piece should look and feel like. “Engraving” is often used loosely in product listings, even when the intended result is a dark mark with little recess.
- Surface marking: contrast is the main requirement. On suitable metals, a thermal marking process can change surface appearance without the recess associated with deep engraving.
- Coating removal: the design reveals a different layer or substrate. Test whether the exposed area remains suitable for outdoor use.
- Recessed engraving: the laser removes material. Depth, texture, edge quality and any later paint fill become acceptance criteria.
A deeper mark takes additional processing and removes more material. It does not automatically look better or remain more legible. A small logo may lose fine details when aggressively engraved, while a paint-filled recess also depends on the paint and finishing process.
Is 20W, 30W or 50W enough?
These are useful configurations to compare, rather than fixed quality grades. A lower-power fiber system may meet a modest text-marking workload; a higher-power configuration may reduce processing time for a qualified job. The result still depends on the source, lens, pulse settings and finish. Request the same artwork on the same material from each proposed configuration.
Measure the complete cycle: load, align, focus, mark, clean and inspect. A maximum scanner-speed figure does not predict how many accepted clubs a shop can deliver per hour. For pulse-control background, see source 1 below.
Check fixtures, focus and assembled-club clearance
A machine can be suitable for steel and still be unsuitable for your assembled club. Verify the space needed by the head, shaft and fixture with the protective enclosure in its intended operating position.
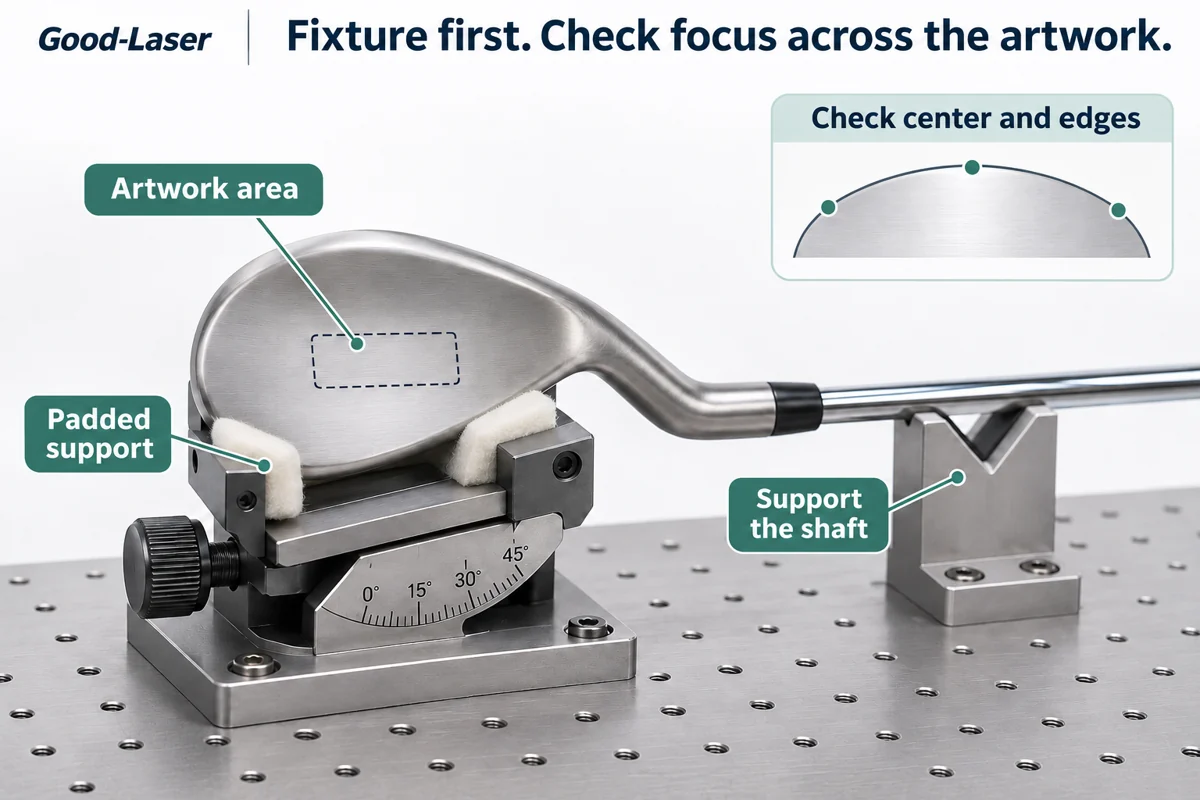
Workholding and access
Ask for a loading demonstration with your club or a dimensionally representative sample. A padded support should locate the head consistently without damaging its finish. An attached shaft also needs support so its weight does not tilt the head during the job. Document the fixture position for repeat orders.
The marking field describes the area the beam can address; it does not describe the volume available for the whole object. Check clearance around the hosel, the fixture height and the space available to load and remove the club. If an assembled club cannot fit, discuss another approved workstation or professional disassembly with a clubmaker. Do not defeat an interlock to make it fit.
Curves, rotary tools and focus
A short design on the back of a head may work with a fixed or tilting fixture. Text wrapping around a cylindrical component may require a compatible rotary system. A rotary attachment does not automatically solve the changing shape of an irregular head.
Check focus across the intended design, including its edges. Setting focus at one point does not prove that an entire curved surface lies within the useful focus range. Large wraparound artwork may need repositioning, segmented processing or a system specifically designed to manage changing surface height. Confirm that capability before buying it.
Choose an engraving location that suits the club
For routine personalization, begin the design discussion with a small area away from the striking face, such as a suitable rear surface of a wedge or putter. The club’s construction and finish still need review. Keep existing model identification and essential markings readable.
Competition use adds another consideration. USGA equipment rules address impact-area roughness, grooves and decorative markings; putter-face markings also have restrictions. A personalized club is not automatically non-conforming, but an attractive result is not proof of conformity. Avoid offering groove recutting or face texturing as ordinary logo engraving. Check the current rules and seek an equipment ruling when the proposed modification is uncertain. See source 2 below.
Agree on a placement proof before processing a customer’s club. Confirm spelling, artwork dimensions and orientation from the customer’s viewing angle. For valuable or coated clubs, also establish how the modification affects the manufacturer’s warranty and the agreed finish.
Validate a sample before processing customer clubs
Use a sacrificial head with the same material and finish where possible. A flat steel coupon can help establish a process, but it cannot validate the curvature, coating stack or clearance of an assembled club.
- Record the item. Note the club model, component material, finish and whether the shaft stays attached. Photograph its existing condition.
- Approve the artwork. Check its physical dimensions and convert text to outlines where the software workflow requires it. Avoid lettering too small to remain clear after finishing.
- Verify the setup. Confirm loading, fixture support, focus, enclosure operation and extraction before running the approved process.
- Develop the mark on a sample. Use the equipment supplier’s starting procedure and record the source, lens, power, speed, frequency, pulse duration where adjustable, hatch spacing and passes. Settings from another machine are not interchangeable.
- Inspect the finished piece. Check alignment, contrast, edge condition and any damage around the mark after cleaning. If depth is specified, measure it with an appropriate method.
- Save an approved reference. Retain the artwork version, fixture photos, parameters and accepted sample. Recheck when the club finish or machine configuration changes.
For a traceability application, a code must remain readable after processing. Good-Laser’s guide to laser 2d code engraving on metal explains why contrast, size and surface conditions deserve separate checks. Use a code only where there is enough suitable space; initials or a short serial number may be more practical on a small head.
| Observed problem | Checks to make before changing the process |
|---|---|
| One side of the design looks weak | Surface height variation, focus at the edges and fixture tilt |
| Repeated outlines do not coincide | Part movement, shaft support and positioning repeatability |
| The mark looks dark before cleaning but fades afterward | Loose residue versus a durable surface change; repeat the agreed cleaning check |
| The coating lifts or the surrounding finish changes | Coating compatibility and heat input; stop and reassess on a sacrificial sample |
| A readable logo takes too long to produce | Artwork size, fill strategy, passes and loading time before changing machine power |
Is the Good-Laser Mark M20 a fit for your golf work?
The Mark M20 is a relevant Good-Laser model to evaluate for metal personalization. The current marking-series page lists a fiber source, 20W/30W/50W configurations and a standard 110 × 110 mm marking area. These specifications make it a candidate for sample assessment, not a verified fit for every golf club.
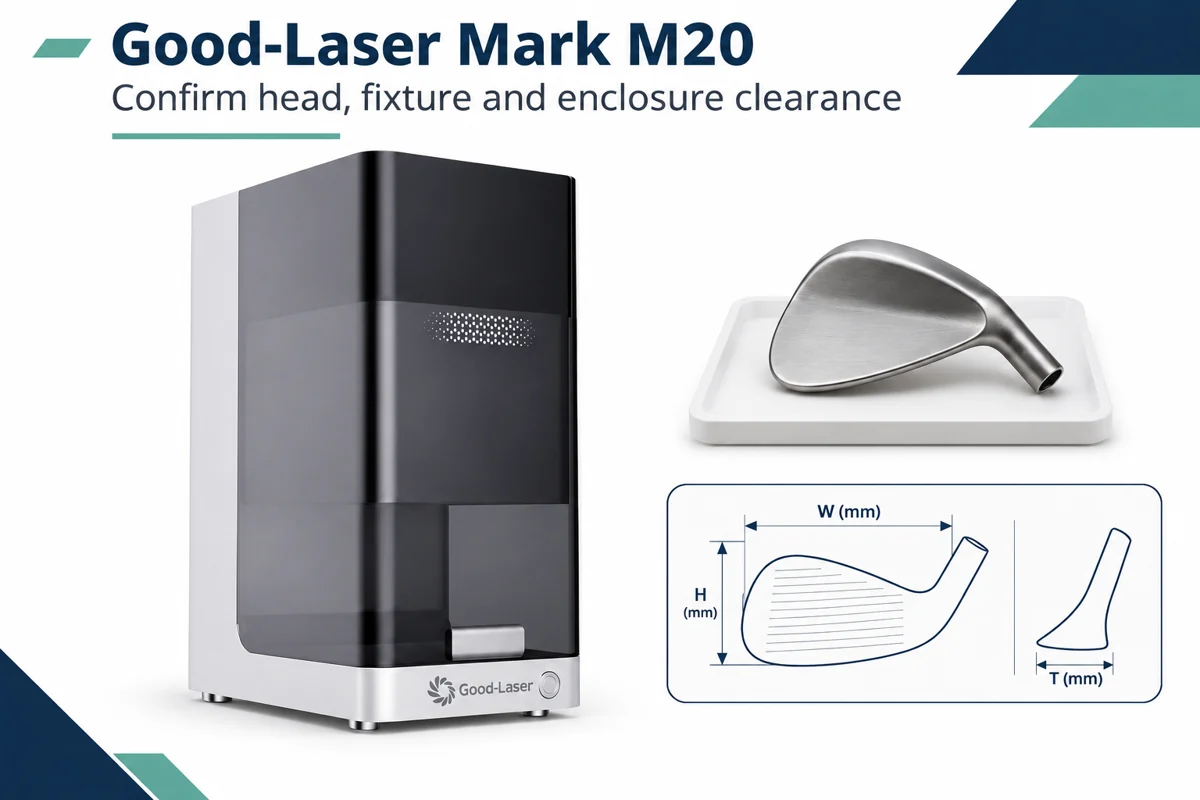
Ask Good-Laser to confirm the quoted source, usable working height with the fixture installed, supported software and complete-club clearance. The public page does not establish that the quoted source is MOPA or that a shaft can pass through the enclosure. Confirm those points explicitly if they are requirements.
For a broader comparison of finishes and source types, the guide covering coated metal for laser engraving helps separate coating work from direct metal engraving. If your golf business also makes non-metal merchandise, assess that product line separately instead of assuming the same fiber setup will handle every item.
Budget for accepted jobs and a complete workstation
Include the fixture, extraction, any approved enclosure arrangement, software, training, maintenance and sample development in the quote. A machine-only price leaves out costs that can determine whether short personalized orders are profitable.
When considering how much does a laser engraver cost, compare quotations against the same finished sample and workload. If you are selecting the best laser engraver for small business, calculate the margin after design time, handling, finishing and the cost of rejected work. There is no universal payback period for a golf engraving service.
Safety provisions belong in that budget. An exposed high-power marking beam can present direct and reflected-beam hazards, while engraving can generate airborne contaminants. Use the manufacturer-approved enclosure and controls, suitable extraction and trained operating procedures. Eye protection must match the assessed hazard and is not a substitute for a properly controlled workstation. See source 3 below.
Frequently asked questions
What is the best type of laser engraver for golf clubs?
For bare metal heads, start with a pulsed fiber system and validate it on the actual finish. Consider MOPA when adjustable pulse duration is needed for the required result. The best fit also needs to accommodate the club and fixture safely and complete accepted jobs within your production schedule.
Can a 20W fiber laser engrave a golf club?
A 20W fiber configuration can be a candidate for text and logo work on suitable metal heads. It is not a universal guarantee of depth or speed. Ask for the intended artwork on a representative sample, then judge the cleaned result and total cycle time before selecting that configuration.
Do I need a rotary attachment?
Not for every job. A small mark on an accessible rear surface may need only a secure fixture. A design that wraps around a shaft or hosel may need rotary positioning. Confirm the component’s geometry, the machine’s rotary support and clearance; an irregular head may require a different approach.
Can I engrave a club without removing the shaft?
Only if the complete club can be supported and processed within the machine’s approved operating arrangement. Check the shaft’s travel and loading space as well as the head. A marking-field dimension alone cannot answer this question. Never leave a protective door open or bypass an interlock to accommodate the shaft.
Will laser engraving affect performance or tournament eligibility?
That depends on the modification and its location. Do not promise zero effect on every head or finish. For tournament equipment, check the relevant rules before altering face markings or grooves. A conservative rear-surface design still requires material and construction assessment; warranty questions should go to the club manufacturer.
Can the same machine engrave golf balls and graphite shafts?
Do not assume so. A metal-head result says little about a polymer ball cover or a composite shaft. Their materials, coatings and functional requirements differ. Treat each as a separate qualification project, and avoid processing an unidentified composite or plastic with settings developed for metal.
Request a sample assessment from Good-Laser
Send Good-Laser the club model, material and finish, photographs of the intended marking area, artwork dimensions, preferred appearance and expected order quantity. State whether the shaft must remain attached. Ask for a proposed configuration and fixture assessment, followed by a sample that you can approve before ordering equipment.
Technical sources
- IPG Photonics: Infrared nanosecond fiber lasers — background on pulsed sources and adjustable processing parameters; not evidence of Mark M20 configuration.
- USGA Equipment Rules: Club face — impact-area requirements, decorative markings and putter-face provisions.
- OSHA Technical Manual: Laser hazards — beam hazards, airborne contaminants and control measures.