QR Code Laser Engraving: How to Make Durable, Scannable Codes
QR code laser engraving creates a lasting pattern on a surface, but a durable mark still needs enough contrast and space to scan. Use clean artwork, preserve the blank border, match the laser to the material, and test the finished piece with the phones or readers your customers will use.
A wooden menu stand and a stainless steel equipment tag need different marking processes. Both can fail for the same reason: the small squares merge, glare hides part of the pattern, or the link stops working. Plan the code, the material and the destination together before making a batch.
What makes a laser-engraved QR code scannable?
A QR code contains square elements called modules. The scanner needs to distinguish the dark modules from the light spaces and locate the pattern against its surroundings. A logo that looks sharp to the eye is not a useful test of whether a machine can reproduce a small QR code.
Check the actual engraved pattern under magnification. Narrow light gaps should remain open, dark modules should be filled, and the three large corner patterns should stay intact. Keep decorative frames and the Good-Laser or customer logo outside the code and its clear border.
For broad phone compatibility, aim for dark modules on a light, even background. A pale mark on dark anodized aluminum reverses that arrangement. Test the intended readers before accepting an inverted code; another option is to mark the surrounding field while preserving dark modules.
How large should you engrave a QR code?
There is no universal minimum size for an engraved QR code. The required area depends on the number of modules, how cleanly the material holds their edges, and the intended scanning distance.
DENSO WAVE specifies a quiet zone four modules wide on every side. Reserve that space when laying out the tag. It must remain visually clear, including after cleaning, mounting and finishing.
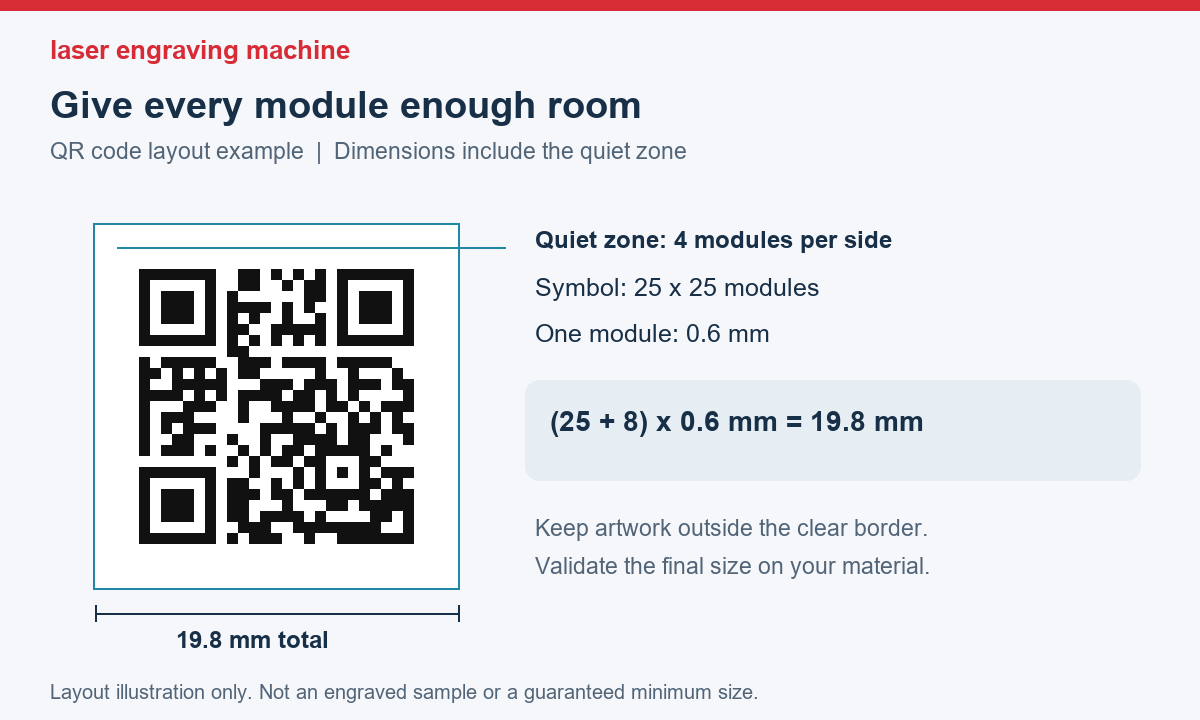
Total width = (modules across the symbol + 8) × module width.
For a 25-module symbol with 0.6 mm modules, the reserved square is 19.8 × 19.8 mm. If a longer payload produces 33 modules at the same module width, reserve 24.6 × 24.6 mm. These are calculated examples; both still need a material and scanning test.
For a first prototype, compare two physical sizes on the actual stock instead of committing to the smallest layout. If the smaller version requires careful camera positioning, give the code more room. A customer's phone and lighting may be less forgiving than your workshop setup.
Match the laser to the material
| Material | Process to evaluate | What can prevent scanning? |
|---|---|---|
| Light-colored wood or plywood | CO₂ engraving or a suitable blue diode laser | Grain, smoke staining and char spreading into light gaps |
| Laser-compatible two-color engraving sheet | A laser approved for the exact sheet composition | Incomplete top-layer removal or damage to the contrasting core |
| Clear acrylic or glass | CO₂ processing with a tested contrast treatment or backing | The surroundings showing through, reflections and low contrast |
| Anodized or coated aluminum | Compatible coating marking or removal; validate the finish | Reversed contrast, glare or a damaged surface layer |
| Bare stainless steel and other metals | A suitable fiber marking system; test the alloy and finish | A mark that is visible at one angle but disappears at another |
Wood, signs and menu stands
Use a flat, consistent surface and keep the code away from knots, joints and mounting holes. An attractive grain pattern can interrupt a small symbol. Good-Laser's Blue 530 diode laser engraver is one option to evaluate for compatible wood projects; confirm the material and required code size with a sample.
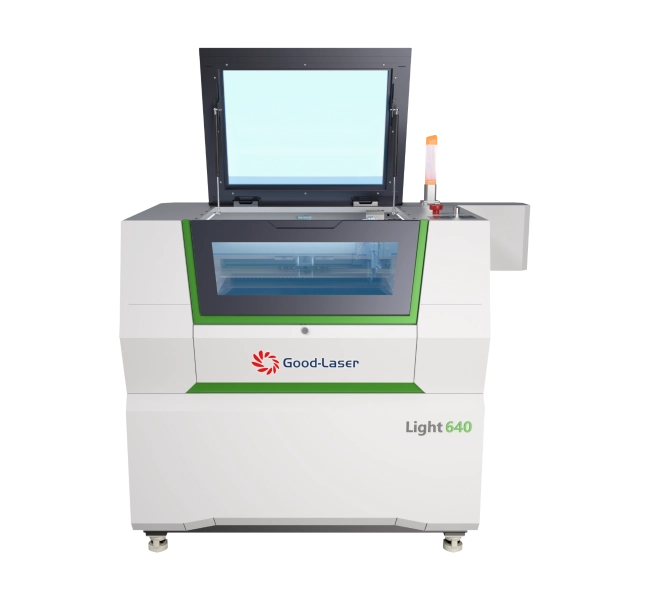
For a workshop making signs as well as QR tags, the Light 640 CO2 laser cutter provides a different production option. Its published material range includes wood and acrylic. Select the configuration around your wider workload, then validate the QR engraving separately.
Metal tags and equipment identification
For bare-metal tags, evaluate the Mark M20 fiber laser engraver. Good-Laser's product information identifies fiber marking and metal applications. Ask for your actual QR artwork on the specified alloy and surface finish; a generic logo sample does not establish QR readability.
For laser aluminium engraving, specify whether the surface is bare, anodized or coated. Removing or changing a coating creates a different result from marking the underlying metal. Check both contrast and the effect on the protective finish.
Glass and transparent displays
A frosted pattern can look clear against a dark tabletop and disappear when the sign moves in front of a window. When laser engraving glass, assess the finished display with its intended backing and lighting. If dependable phone scanning is the priority, an opaque insert may be easier to validate.
Use only materials and coatings approved for the machine. Do not laser unknown plastics or PVC-containing sheet. Keep extraction operating and follow the equipment's enclosure and fire-safety instructions.
Prepare the file and the link before engraving
Use a short, stable URL on a domain your business controls. A long tracking address can increase the symbol's density. Put analytics or changeable destinations behind a maintained redirect where practical, and assign someone to keep the domain and destination working.
A code containing a fixed URL can still open content you update later. The engraved data remains the same; the webpage or redirect target changes. A third-party dynamic-code service adds another dependency, including its account status and terms.
Export SVG when the laser software supports it, preserve square proportions and inspect the imported dimensions. Use filled modules, not thin outlines. If you use a bitmap, avoid a compressed screenshot and check for blurred edges or unintended grayscale processing.
Preview the laser's actual output. A white rectangle in the drawing may be a separate object, and fill rules can change how overlapping paths behave. Confirm which regions will be marked before running the machine.
QR error correction provides several levels of data recovery. Higher correction adds redundancy and can require a larger symbol. Choose it alongside the payload and physical size; it cannot reliably rescue poor contrast, lost corner patterns or an obstructed quiet zone.
Set up a test that tells you what to change
Start with the manufacturer's guidance for your exact machine and material. A power percentage from another laser is not a transferable recipe. Source type, lens, focus, surface finish and processing speed all affect the result.
- Prepare representative stock. Use the same material, coating and thickness as the order. Keep it flat and secure, then set focus as the machine manual describes.
- Keep the artwork constant. Record its payload, dimensions and correction level so that each test answers a process question.
- Compare a small settings matrix. Vary speed and power around an approved starting point. Label each sample outside its quiet zone and record the settings separately.
- Inspect the gaps. Look for incomplete fills, doubled edges, residue and neighboring modules joining together. Excessive heat can close spaces even when the code looks darker.
- Check fill spacing. Scan-line interval controls the spacing of engraving passes. Use the software's interval test and examine coverage; increasing resolution can also increase processing time and heat.
- Clean and finish the sample. Apply the actual production cleaning method, paint fill or sealer, then scan again.
Change one variable at a time when diagnosing a failed sample. If both the code size and the laser settings change, you will not know which fixed it. Save the accepted artwork and settings with a photograph and a physical reference piece.
Check durability after finishing and handling
A mark can remain visible while becoming unreadable. Scratches across a small pattern, glare from a clear coat or dirt in the recesses can interfere with scanning. Define what the item will face before choosing an acceptance test.
For a restaurant stand, include the actual cleaning product and mounting position. For an equipment tag, agree on relevant abrasion, oil, moisture or temperature exposure with the customer. Do not promise a service life from a fresh sample or substitute a casual wipe test for a required qualification.
Record the reader models, lighting, distance range and test conditions. Confirm that the decoded address or identifier is correct, then check that the destination opens. A successful decode and a functioning website are separate checks.
During a batch, check pieces from different fixture positions and after a change of material lot, focus or settings. If every part has a unique code, validate the identifier-to-part mapping as well. Where a customer requires a formal barcode quality grade, agree on the verification method and suitable verifier before production; a phone scan alone does not establish that grade.
Why does the code scan on screen but fail after engraving?
| Observed problem | What to inspect | Next test |
|---|---|---|
| The code consists of hollow squares | Line-only output or open vector paths | Use filled closed shapes and inspect the output preview |
| Small gaps have disappeared | Heat spread, focus or repeated passes | Compare a larger code and a lower-heat process separately |
| Scanning works only at one angle | Reflective metal, gloss finish or weak contrast | Test the surface treatment under the intended lighting |
| The raw piece scans but the finished one fails | Sealer, paint, residue or mounting hardware | Repeat validation after the full finishing sequence |
| A flat sample works; the tumbler does not | Curvature, rotary setup or distortion | Check the mounted geometry and a less curved location |
| The reader detects the code but no page opens | Encoded URL, redirects, domain and network access | Inspect the decoded address and test the destination directly |
Frequently asked questions
Can a laser-engraved QR code last outdoors?
It can, provided the substrate, mark and finish suit the exposure. Rain, dirt, UV exposure and corrosion can change readability over time. Test the finished assembly for the intended conditions and maintain the linked destination. A permanent pattern does not guarantee a permanently usable code.
Should I use the highest error correction level?
Not automatically. More redundancy can help with some damage, but it may increase the module count. At a fixed physical size, those smaller modules can become harder to engrave cleanly. Compare correction levels at the intended size and choose from actual scan results.
Can I put a logo inside the QR code?
For small engraved codes, place the logo outside the symbol and quiet zone. This keeps the original data pattern intact and simplifies testing. A decorative code that scans on a screen may lose that margin of reliability when transferred to grainy, reflective or curved material.
Does a deeper engraving scan better?
Depth alone does not determine readability. The reader needs distinguishable modules and an unobstructed border. More passes can change edge shape or collect residue. Set depth according to the application's wear requirements, then verify that the resulting contrast and geometry remain readable.
Can a CO₂ laser put a QR code on metal?
Some coated or anodized metals can be marked with compatible CO₂ processes, and approved marking compounds may provide another route. That does not establish direct engraving of bare metal. For bare-metal work, evaluate a suitable fiber system and request a sample on the specified alloy.
Can I change the destination after engraving?
You cannot change the data already engraved. You can update the webpage at that address or change a redirect you control. Keep the encoded URL active and test it after website changes. This also avoids relying on a disposable campaign page for a long-lived physical tag.
Choose a Good-Laser setup around a finished sample
When choosing a laser engraving machine, send Good-Laser the material and finish, QR artwork, available marking area, expected quantity and intended reader. Include a photograph or drawing showing curvature and mounting details. For an outdoor or industrial application, describe the cleaning and wear conditions too.
Request a sample of the complete code at its intended size, with the finishing process included. Use that result to decide which laser configuration fits the job and to agree on the scan checks for production.