Laser Engraver for Tumblers: How to Choose the Right Setup
Choosing a laser engraver for tumblers starts with the surface you want to personalize. For compatible powder-coated cups, a CO₂ laser can remove the coating to reveal the metal underneath. For direct marking on bare stainless steel, a fiber laser is generally the more appropriate starting point. Selected coatings can also work with diode lasers, but the exact finish needs testing.
The machine is only part of the decision. Your tumbler must fit inside the working space, rotate securely, and remain correctly focused throughout the design. These material differences are reflected in manufacturers’ tumbler processing guidance.
For a gift business or personalization workshop, the most useful buying question is: can this complete setup repeatedly produce the finish your customers expect on the cups you actually sell?
Match the Laser to Your Tumbler Surface
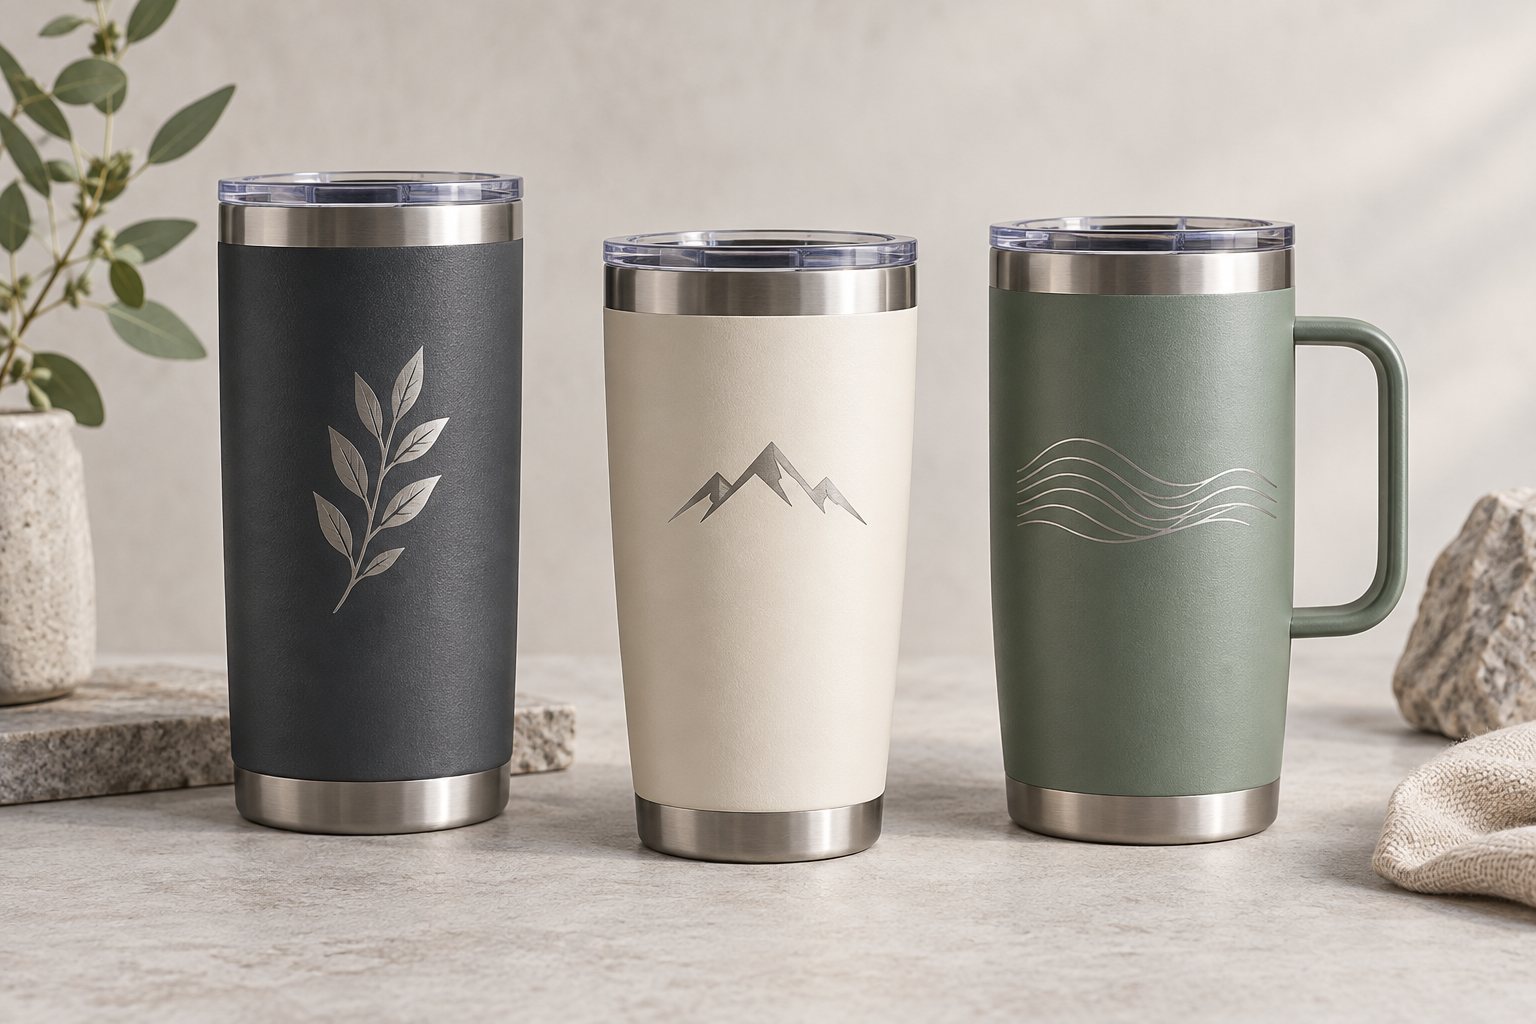
Two stainless steel tumblers can require different processes because their outer surfaces are different.
| Tumbler surface | Laser option to evaluate | Result to discuss with the supplier |
|---|---|---|
| Compatible powder coating | CO₂; selected diode systems | Removal of the coating to expose the underlying metal |
| Bare stainless steel | Fiber | Direct surface marking or engraving, depending on settings |
| Bare stainless steel with a marking compound | CO₂ with a compatible compound | A bonded surface mark rather than deep metal removal |
| Anodized aluminum | CO₂ or fiber, depending on finish | A contrasting change in the anodized surface |
| Compatible glass | CO₂ | A frosted appearance, with testing for surface quality |
Compatibility depends on the exact coating, alloy, or glass composition. A successful sample on one blank does not validate every cup in the same product category. See the material-by-material comparison for these distinctions.
Before requesting a quotation, decide what the finished design should look like. A silver logo revealed through a black coating is different from a dark mark on uncoated steel. Send a reference image of the desired finish together with information about the blank.
Avoid using “metal engraving” as the only requirement. When choosing a laser engraver for metal, ask the supplier whether the proposed process removes a coating, bonds a marking compound, or directly modifies the metal. Match the demonstrated result to the finish you want on your tumbler.
Check the Rotary Attachment Before Comparing Power
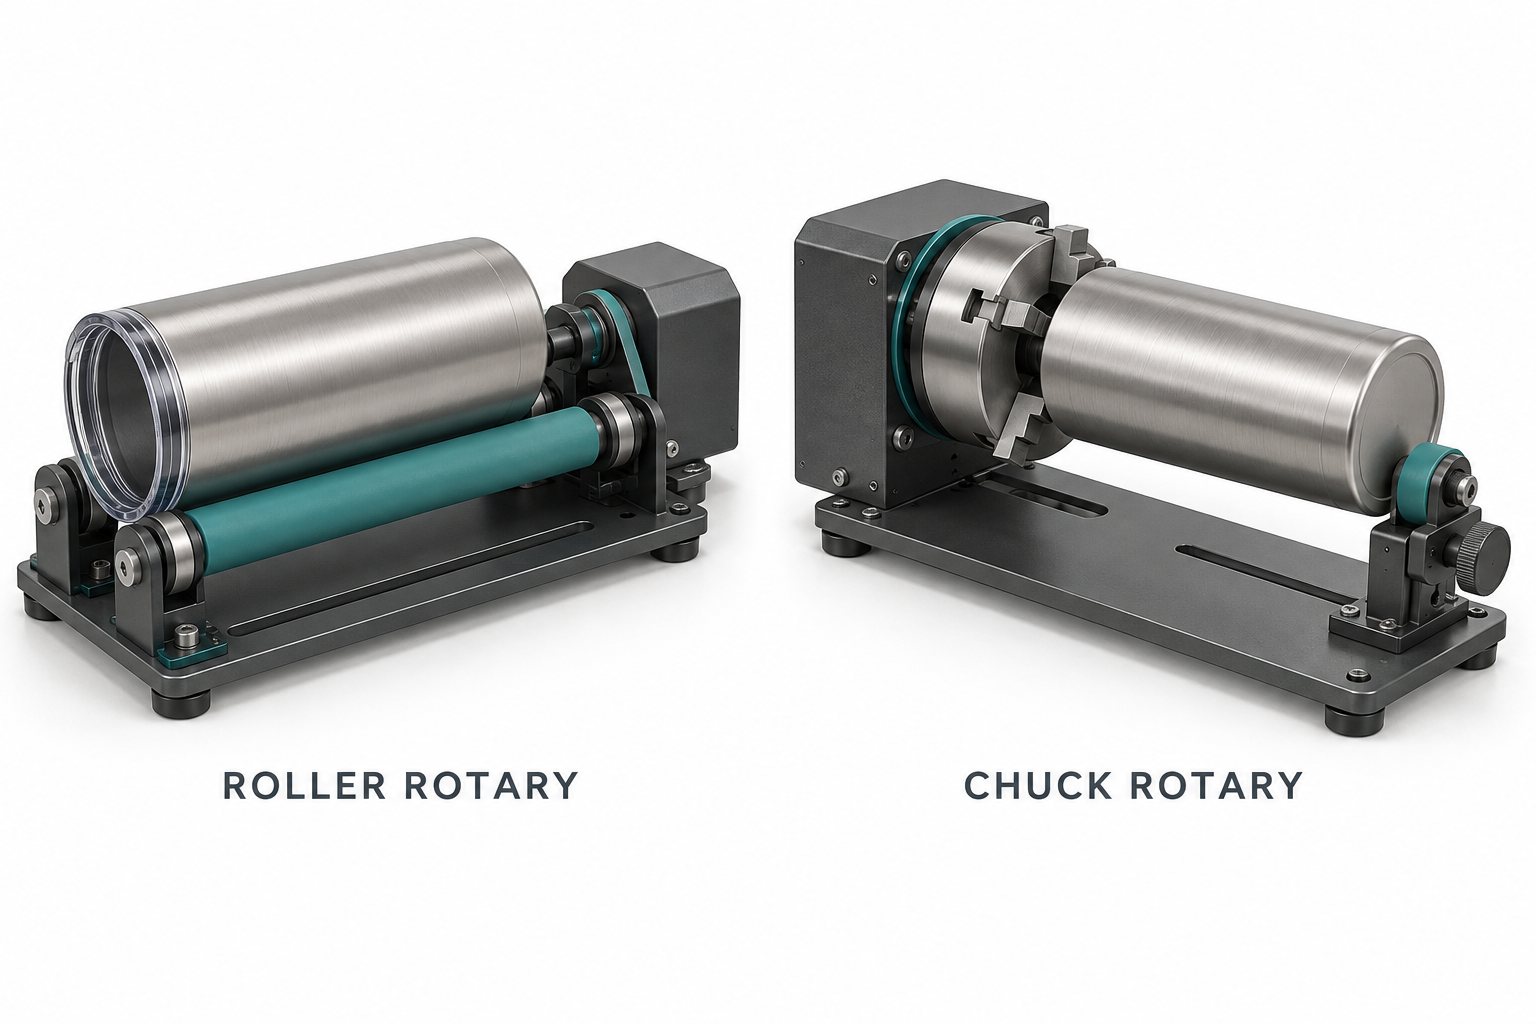
A rotary attachment turns the cup during engraving. Its ability to hold your particular tumbler matters as much as compatibility with the machine.
A roller rotary supports the object on driven wheels or rollers. A chuck rotary grips the object with adjustable jaws. Their setup parameters differ, so the software configuration must match the hardware. LightBurn’s rotary documentation explains these arrangements.
Request a demonstration using the shapes in your intended product range:
- A straight-sided tumbler for regular name and logo orders.
- A tapered cup for designs extending across a changing diameter.
- A handled tumbler for checking grip and collision clearance.
- Your largest and smallest blanks for verifying the operating range.
During the demonstration, watch loading and unloading as well as engraving. Ask how the operator establishes the same starting position on the next cup. A fixture that produces an excellent sample but requires lengthy adjustment between pieces may be inconvenient for repeat orders.
Review the available laser engraver accessories with your supplier, and confirm which rotary, cables, supports, and mounting components are included in the quotation. Ask for compatibility confirmation using your exact machine configuration and tumbler dimensions.
Measure Usable Clearance, Not Just Bed Size
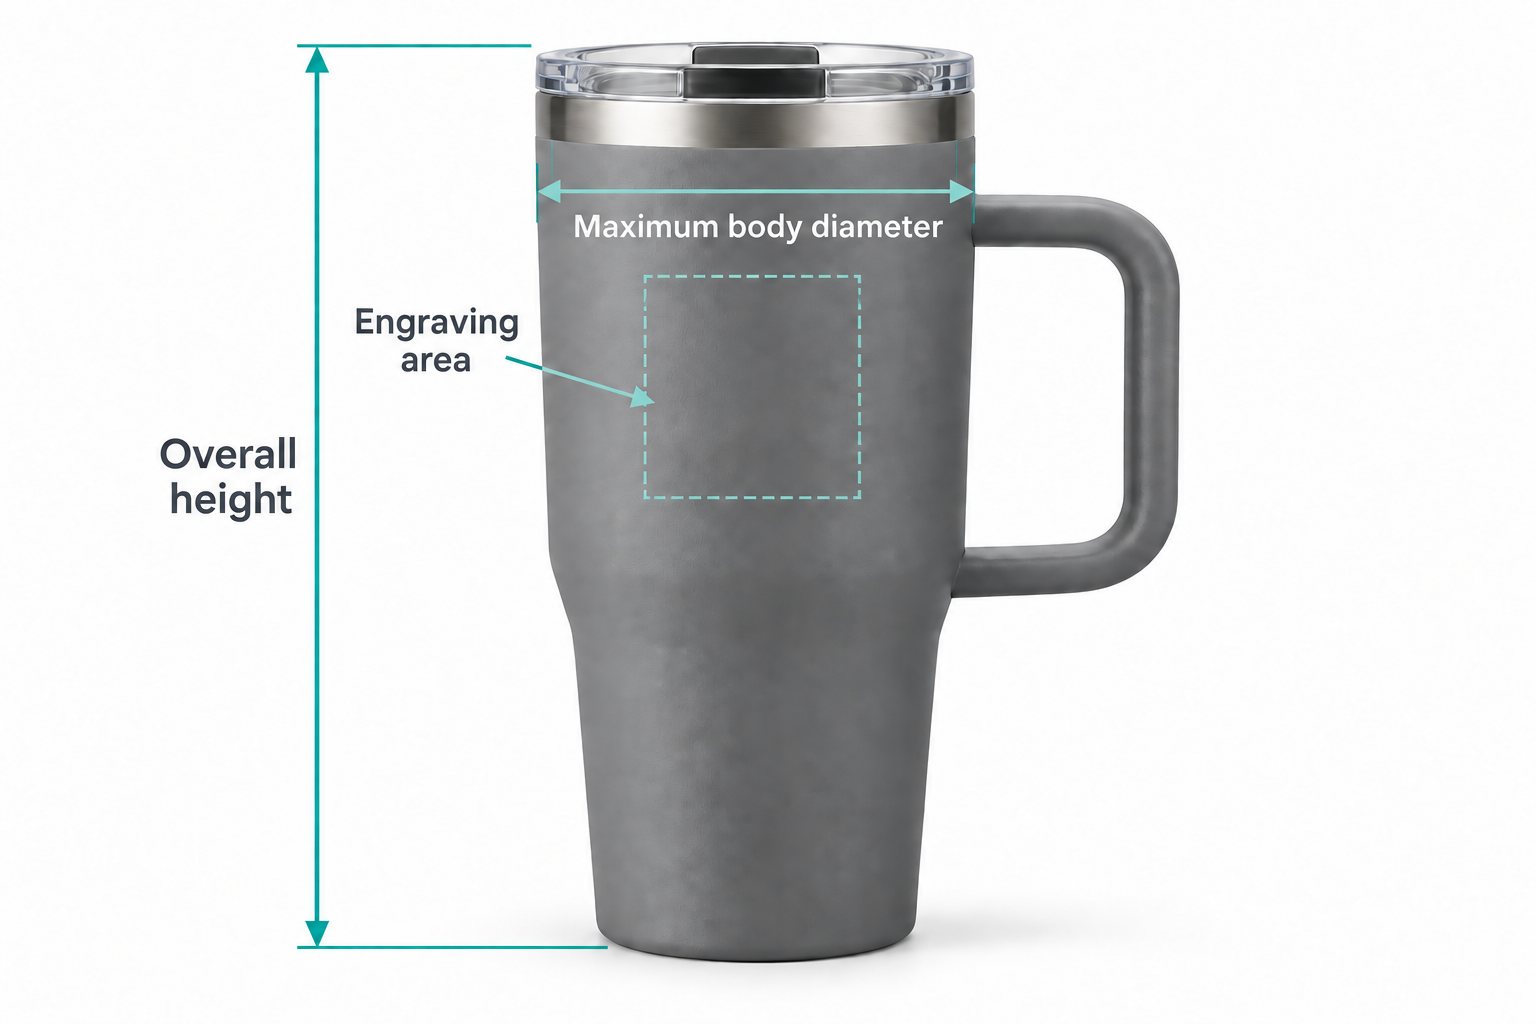
A large flat working area does not establish whether a machine can engrave your tumbler.
Prepare a dimension sheet containing the cup’s overall length, maximum body diameter, handle projection, and intended engraving area. Give this to the machine supplier before ordering.
Ask for confirmation that the proposed configuration can accommodate the cup and rotary together, reach the correct focus, and complete the required movement with the enclosure in its normal operating position.
Capacity labels such as “20 oz” or “40 oz” are insufficient for this check. Different tumbler designs can share the same capacity while having different body shapes and handles.
For handled cups, request a full movement check. A cup may fit when stationary but encounter an obstruction as it turns. For tapered cups, ask how the surface will be supported and leveled throughout the engraving area.
Separate Taper Correction from Focus Adjustment
Tapered tumblers introduce two problems: the circumference changes along the cup, and the surface may sit at an angle to the laser bed.
Software can compensate for the changing diameter. For example, LightBurn’s Taper Warp tool adjusts artwork using the object’s measurements. However, that correction does not fix an incorrect physical focus. LightBurn specifically instructs users to position the engraving surface parallel to the bed. See the Taper Warp guide.
For a first sample, use a simple design with straight lines and clear spacing. This makes distortion easier to spot than a dense decorative pattern.
Approve a small logo and a full wrap separately. Success with a narrow design does not demonstrate that a continuous pattern will meet correctly around the cup.
Evaluate Production Quality with a Repeatable Sample Test
Instead of asking only for a photograph of a finished tumbler, request a short, repeatable acceptance test.
Supply a blank from your intended source and artwork containing your typical lettering, a filled shape, and the smallest detail you expect to sell. Ask the supplier to record the machine configuration, rotary arrangement, processing settings, and elapsed time.
Evaluate the cleaned result against specific criteria:
| Check | What to assess |
|---|---|
| Lettering | Are the smallest required characters readable? |
| Filled areas | Is the appearance consistent across the design? |
| Edges | Are boundaries clean enough for your product standard? |
| Placement | Is the design correctly positioned relative to the handle or rim? |
| Repeatability | Do several consecutive cups look consistent? |
| Handling time | How much operator work is required between cups? |
Keep an approved sample as a physical reference. Photographs can conceal differences in reflectivity, texture, and residue.
If you plan to buy blanks from several suppliers, qualify each one. Record the blank supplier and product code alongside the engraving settings so that a later change in materials is easier to investigate.
Build a Controlled Tumbler Engraving Workflow
Once the equipment and material combination is approved, turn the successful sample into a documented process.
- Identify the blank. Record its supplier, finish, dimensions, and batch information when available.
- Prepare the artwork. Confirm spelling, size, placement, and customer approval before processing.
- Install the rotary. Follow the machine manufacturer’s connection and setup instructions.
- Check movement and focus. Confirm the grip, clearances, orientation, and intended engraving position.
- Run a material test. Use the supplier’s recommended starting parameters on a spare matching blank.
- Clean and inspect. Judge the final appearance after the specified cleaning procedure.
- Save the job record. Keep the artwork, settings, fixture details, and approved result together.
Do not treat a power percentage copied from another machine as a universal setting. Published project settings refer to a particular machine and material combination; Epilog’s wine tumbler project, for example, identifies the equipment used alongside its parameters.
Use the enclosure, extraction, and operating procedures specified for your equipment and material. Ask the blank supplier to confirm that the coating is suitable for laser processing.
Plan Full-Wrap Designs as a Separate Product
A full-wrap tumbler deserves its own setup and pricing.
For a straight cylinder, circumference equals π multiplied by diameter. An 80 mm diameter cylinder has a circumference of approximately 251.3 mm. That provides a geometric starting point, but the finished wrap still needs verification on the actual setup.
Inspect the join where the pattern meets itself. If there is a gap or overlap, check measurement and rotary calibration before repeatedly resizing the artwork.
LightBurn’s full-wrap tumbler guide provides a dedicated workflow for this application.
For customer orders, consider offering separate options for a single logo, two-sided personalization, and a full wrap. Measure the actual work involved in each option before assigning prices or delivery times.
Calculate Cost per Accepted Tumbler
The purchase price of the laser is only one part of the budget. Request a complete quotation covering the rotary, required supports, extraction, cooling where applicable, software, installation, and training.
Then estimate production cost using accepted output. Consider this illustrative batch in US dollars:
| Cost item | Assumption | Batch cost |
|---|---|---|
| Blank tumblers | 50 × $6.00 | $300 |
| Operator labor | 3 hours × $20.00 | $60 |
| Consumables and machine allowance | Assumed amount | $20 |
| Packaging | 48 accepted cups × $1.00 | $48 |
| Total | 48 accepted cups from 50 blanks | $428 |
The cost per accepted tumbler is approximately $8.92: $428 divided by 48.
These figures are hypothetical, not market prices or a profitability promise. They exclude shipping, taxes, selling fees, customer acquisition, and general business overhead.
This approach helps expose the cost of rejected blanks and extra handling. When comparing equipment, time a representative order from loading through inspection rather than relying solely on a maximum engraving-speed specification.
Where the Good-Laser Light 640 Fits
Businesses considering a CO₂ platform can evaluate the Good-Laser Light 640 laser engraver and cutter. Its product page lists a 600 × 400 mm working area, automatic and manual focus, and compatibility with LightBurn.
Those specifications provide a starting point for evaluation. For tumbler work, request confirmation of the exact laser configuration, compatible rotary, usable cup dimensions, and performance on your selected coating.
Build the purchase specification around your real orders: the blanks you use, the artwork customers request, the finish you want, and the number of accepted pieces needed per shift. A sample demonstration should validate that combination.
Frequently Asked Questions
What laser power do I need for tumblers?
There is no single wattage requirement for every tumbler. First identify the surface and desired result, then ask for a timed sample on the proposed machine. Compare quality and complete cycle time rather than wattage alone.
Can one setup handle both straight and tapered cups?
Possibly, but both shapes need validation. Check the rotary’s holding range, available supports, physical leveling, and software workflow. Include both cup styles in your acceptance test.
Can I use the same settings for different colors?
Treat each new finish as a test requirement until consistency is demonstrated. Keep a separate approved record for each blank and finish rather than assuming a familiar color name represents an identical coating.
How should I evaluate a machine demonstration?
Bring your own blank and representative artwork where possible. Ask to see several consecutive pieces, inspect them after cleaning, and record total handling and processing time.
Find a Setup That Matches Your Tumbler Range
The right laser engraver for tumblers should deliver a repeatable result on your actual products, with a workflow your team can maintain.
Request laser engraving samples from Good-Laser to evaluate your intended finish before choosing a machine. Include the tumbler material and coating, dimensions, handle details, artwork, and expected order volume so the team can assess a suitable machine and rotary configuration.